Wednesday, October 30, 2013

ikea hack...faux ostrich covered rast

You all know I love Ikea and diy, so this was inevitable... :)
You're going to love how super easy (PROMISE!) this Rast hack is.
If you've been following along with the One Room Challenge, the brainchild of
Linda @ Calling it Home, you know I'll be using two of these Ikea Rast chests as
nightstands in the makeover of my bedroom. If you'd like to see the progress before the
 big reveal next week you can check it out Week 1, Week 2, Week 3, Week 4, Week 5.
and the Bedroom Reveal 
Btw, the bedroom has a totally different vibe, I just styled up a little corner for you.  


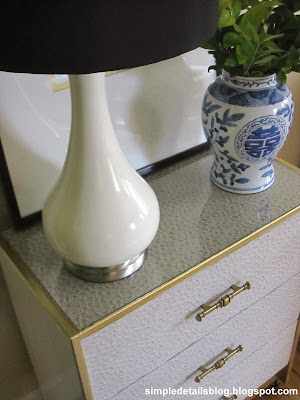
My inspiration was this amazing piece owned by designer Ryan Korban.


Here's how it went down:

The popular Ikea Rast 3 drawer chest for $34.99,
1 yard Vinyl Ostrich (Color - Ice) from Fabric Empire $19.99  
3 Brass Pulls from Re-Store $1.50 each 


Measure and drill for your hardware. 
Cut 3 pieces of fabric the exact size of the drawer fronts.


I used Spray Adhesive to adhere the vinyl per manufacturer's instructions. I'd highly suggest
 doing it outside, it's strong! I found it easiest to roll the piece up and begin at one end.


Press down and smooth out as you unroll the vinyl. This is quick and easy, and forgiving
if you need to lift it up and re-work it. When I finished it had stretched about a 1/4 of an inch
 beyond the edge of the drawer, I placed the drawer on a cutting mat and removed the extra
 using an X-acto knife.


When I got to this point and put my drawers in you could clearly see the edges of the pine
 showing between the drawers. I carefully peeled back a bit of the vinyl and went back
 and painted the edge of the drawers the same color as the vinyl then re-secured the edges of
the vinyl with my hot glue gun. 

DON"T DO WHAT I DID!!!
*** You should paint the edge BEFORE spraying the adhesive and attaching the vinyl*** 

I taped off the edges and used Martha Stewart's Liquid Gilding in Brass ($3.50 with coupon at Michaels, 1 container will cover 2 chests) on all the edges and the base at the bottom in front.
 Since you'll be covering the top you only need to apply it about an inch around the edge. 


While the liquid gilding is drying I attached the hardware. I used an oversize needle as a guide
and pushed it through the drilled hole from the back to the front of the drawer. Using an X-acto
 knife I cut a small circle from the vinyl for the screw to go through.

I had a piece of glass cut for the top 23" x 11 1/2" ($15) and used the glass as a template for
the piece of vinyl for the top. I didn't secure the vinyl, just placed it under the glass. 


I added 1 1/4" casters to the bottom, it took about 10 minutes! The pine is soft and I was
 able to screw them on without drilling. The wood at the base of the chest is about 1/2" wide
 and the base of caster about an inch, I only secured one side, it's not visible and very sturdy.
The casters were $7 for four, and already gold.   


The total cost per chest is $75.00.

You could easily use any thrifted piece of furniture to keep the cost down,
I chose the Ikea Rast because I wanted a narrow piece and it is 11 1/2".


If you'd like to check out another REALLY SUPER EASY hack I did: 

If you're not familiar with the One Room Challenge stop by the links above,
where you can find 20 bloggers making over their rooms in 6 weeks!
Crazy talent, you're in for a treat!
My final Bedroom Reveal here


one room challenge...week five


This post is going to be short and sweet because it's... 


and I've still got a long to-do list that's making me totally stressed out a tad anxious.  
Since I was out of town for the weekend celebrating my awesome dad's birthday I'm
feeling extra crunched this week, but I'm so excited at the thought of my room
being finished and being able to enjoy it in one week!   

I did finish my hack of the Ikea Rast chests - stop by tomorrow for the reveal and tutorial.
Here's a peek for you, let's just say I'm a happy hacker. :) 


My window shades arrived! Yay!


I'm making a simple tailored bed skirt using this Nate Berkus fabric (Patras - Chamomile) and
 although I'm sewing mine, I'm counting on this super easy tutorial to have it finished in no
 time! Thanks cute friend, it's perfect for crunch time! 


I did some shopping, still testing out some lamps. :) 


My chair was on the list for painting today, but mother nature wasn't 
cooperating at 35 degrees, fingers crossed for tomorrow!


This week I'm working on:
 making pillows
 artwork projects
bedding, and accessories
the chair - paint and re-upholster
hang the headboard, mirrors, window treatments
paint the trim
wash the windows
eeeek!

Good thing it's Halloween because my house is frightening, 
a scary mess of projects and supplies all over!

Thank you all so much for stopping by every week, I couldn't do it without
your support and encouraging comments, they truly keep me motivated!

xoxo, pam    

Be sure to check out what my friends have been up to this week and don't forget to 
stop by Linda's on Thursday to see the progress all the others have made:


Monday, October 28, 2013

paperwhites...it's time

I know you don't want to think about it before Halloween,
 but the holidays are sneaking up on us! :)
I bought my paperwhite bulbs at Home Depot today, they couldn't be easier to
 plant and force for beautiful blooms in December. A pretty addition to your decor or
 to give as a gift. I'm planting mine within the next few days to insure they'll be blooming
 for my annual Christmas party in early December.

houzz.com

These are the same bulbs I buy every year, but $1 less this year, go figure???
If you've never forced them before you can follow my instructions from last year here.


The container options are endless, here are a few ideas,
a pretty blue and white bowl...

 (via Pinterest - no source)

clear glass vase...

 celebrate-creativity.com
small urns...

 decordeprovence.blogspot.com


wrapped in burlap with satin ribbon...
antiqueaholics.blogspot.com

a rustic wood box...
 
 mavoielactee.tumblr.com

vintage white pottery...

Amy Bradstreet

My iron urns last year...


This year I'm doing something similar to this with a modern twist.
I'll show you in a week or so. :)  

bhg.com

Do you plant paperwhites?


guest posting...sew a fine seam

Hey everyone, hope you had a wonderful weekend.
I got to hang out with all of my favorite people. :) Our extended family spent the 
weekend in the mountains celebrating my dad's 75th birthday! We had a great time
just hanging out together ~ cooking, eating, playing games, watching football,
nothing big, just a perfect low key time lounging around! 

Today I'm happy to be over at my friend Jill's blog, Sew a Fine Seam.
Don't let the name fool you, while she does have crazy amazing sewing skills, she
 also knocks out some fabulous diys, all while home schooling her three daughters! 

Here are a few snippets from her blog...

If you've ever had an inkling to paint your fireplace this beautiful makeover
 will have convinced in no time! She used Annie Sloan chalk paint on her
 mom's fireplace, it went from red brick to fresh and updated here....
   

a pretty vignette styled on an industrial cart...


tutorial for Roman Shade here...


I forgot to mention she has a photography business, too...


Stop over at Sew a Fine Seam here where I'm sharing a favorite
crock pot recipe that our family loves on cool fall days.   

Friday, October 25, 2013

colorful and modern client reveal...

Do you all remember this client from back in July? They wanted a fresh infusion of
color and modern elements, and were on board for using a mix of high and low.
We included some furniture and accessories they had, new unique custom pieces, Craigslist
 and thrifted finds, Ikea, and they were awesome at knocking out diys I suggested.

LIVING ROOM


We used Benjamin Moore Cloud White on the walls and trim throughout, and in order to
 take advantage of the beautiful view from their golf course lot decided on a clean look
 of uncovered windows.


Flanking the fireplace we layered mirrors, the vintage lamps were a thrifting find. 
They chose a pair of love seats facing each other and we re-upholstered a tufted ottoman
in a luxurious raspberry velvet. The leopard X benches were one of our diys.


DINING ROOM


 Remember their amazing Sputnik? It's such statement, it extends from the 20 foot
 ceiling, and is visible throughout the first and second floors. We used their existing dining
table above, they did a great job painting it with Annie Sloan's Barcelona. 
(I had forgotten until seeing it now, but I think some gold highlights would be pretty on the
 raised detail).  We had the Parson chairs above reupholstered in the orange geometric and
used the ghost chairs previously in their kitchen. We loved how the rug brought in the pink
 and blue from the living room. 


We plan on trimming out the bookcases for a custom built in look. 


KITCHEN


We debated how much to do to the kitchen since they're hoping to do a remodel in the near
 future. Although it's far from their ideal, I always hate to suggest spending much if you're
 going to rip it out soon. We came up with a Roman shade, a new rug, an awesome fixture,
new barstools, and save for the remodel.  

FAMILY ROOM


They had great basics to work with, the gray sofa, love seat and rug,
we added a few new pillows and the custom ottoman was a one-of-a-kind
piece that was worth the splurge. It's super functional, all the toys
 go inside and it's soft and cushy construction and pattern are baby friendly. 
And, it gives the room a fun dose of pizzazz. 


I loved those felted taxidermy sheep and the open frames were a fun way to 
give them a little presence. 


ENTRY

One more amazing diy the Mister they completed when we were crunched for time. 
Do you recognize this pendant? Hours of spray painting each little flower and stem, 
and then the assembly! It gorgeous and looks great with the Sputnik across the way.  


You can read about the staircase update and diy glass finials here.


It makes me want to ditch all my neutrals! :)

Thanks so much to my awesome clients,
it was truly a pleasure and couldn't have been more fun!


Join me at Sarah's
 Thrifty Decor Chick January Before and After Party 

and at Cassie's with her friends for the
Be Bold Challenge


Related Posts Plugin for WordPress, Blogger...
 
Pin It button on image hover